
DIY Air Cleaners
Do-it-yourself (DIY) air cleaners can be an effective option to filter harmful particles from the air when air cleaners with known performance are not available or affordable. This webpage describes when to consider using a DIY air cleaner, how to build your own, and strategies for using DIY air cleaners during emergencies that impact indoor air quality (IAQ).
On this page:
- Why Consider a Do-It-Yourself Air Cleaner
- Comparing Do-It-Yourself and Commercial Portable Air Cleaners
- How to Build a Do-it-Yourself Air Cleaner
- Choosing a Do-It-Yourself Air Cleaner Design
- Operating Considerations and Safety Tips
- Additional Resources
On other pages:
Why Consider a Do-It-Yourself Air Cleaner
Filtering the air in your home, a key approach for improving indoor air quality, removes particles from the indoor air. Fine particles can affect the heart, lungs and other organs, causing health problems such as burning eyes and runny nose, and aggravating chronic heart and lung diseases. There are many indoor sources of particle pollution. Airborne infectious diseases are also carried on fine particles.
There are a few options to improve indoor air filtration. If you have an HVAC system, consider installing a high-efficiency filter and running the system fan more often to capture more particles from the air indoors. Additionally, consider purchasing a commercial portable air cleaner that is the right size for the room and that does not produce ozone and other harmful byproducts. Do-it-yourself (DIY) air cleaners can be an effective alternative to filter harmful particles from the air, but it is important to understand their limitations.
Commercial air cleaners with a known clean air delivery rate (CADR) are typically preferred over DIY air cleaners. The CADR indicates the size of the room the air cleaner can serve, and the CADR is typically not known for DIY air cleaners.
For information on choosing an air filter or portable air cleaner for your home, see EPA’s Guide to Air Cleaners in the Home.
Comparing Do-It-Yourself and Commercial Portable Air Cleaners
Several studies indicate that well-built DIY air cleaners can perform similarly to commercial portable air cleaners in reducing airborne particles, including wildfire smoke particles and airborne pathogens. However, each DIY air cleaner may perform differently, even after reassembling the same unit when changing filters. Their performance depends on their design and how well they are built and maintained. Even DIY air cleaners of the same design that use different fans or filters can have different CADRs due to the power of the fan or the quality of the filter.
Commercial air cleaners with a measured CADR are typically preferred over DIY air cleaners, because the CADR tells you the size of the room they can serve. Commercial air cleaners are generally standardized from unit to unit, so the reported CADR is a reliable indicator of performance for units of that make and model.
Compared to a commercial air cleaner, a DIY air cleaner may also be noisier.
How to Build a Do-it-Yourself Air Cleaner
There are many ways to put together a DIY air cleaner. Building a DIY air cleaner usually involves attaching one or more furnace filters to a box fan with tape, brackets, or a bungee cord.
EPA has evaluated three common DIY air cleaner designs which have been shown to effectively reduce levels of particles in indoor air. Watch the video and follow the instructions below to learn how to build one of your own.
Tips for Making a Shroud
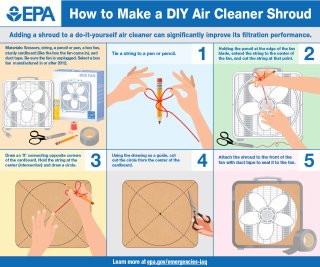
Adding a shroud to the front of the box fan significantly improves filtration performance. You can use sturdy cardboard (such as from the box the fan came in) or wood to create a shroud.
- To make a shroud, first tie a string to a pen or pencil. Use one hand to hold the tip of the pen or pencil over the edge of a fan blade and another to extend the string to the center of the fan to measure the distance from the center of the fan to the tip of the blade. Hold the string in the center of the shroud material and use the pen or pencil to draw a circle. Then cut it out and attach it to the fan with duct tape.
- The shroud should cover the front of the box fan and have a circular opening to allow air to flow only through the center part where the blades are visible.
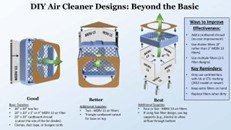
DIY Air Cleaner #1: Simple Design
Supplies for DIY Air Cleaner #1
- 20" x 20" x 1" to 4" Furnace/HVAC Filter Suggested rating: MERV 13
- 20" x 20" Box Fan
Note: Only use certified fans with UL or ETL markings (2012 model or newer) - Duct Tape, Clamps, or Bungee Cords
- Cardboard Shroud
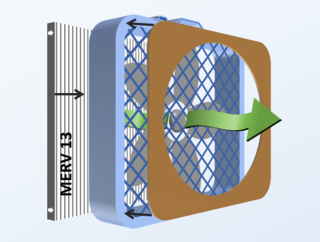
The simplest DIY air cleaner is constructed by attaching one filter flat against a box fan.
- To maximize filtration, choose a high-efficiency filter, preferably rated Minimum Efficiency Reporting Value (MERV) 13 or higher, that is the same size and shape as the fan. Consider also using thicker filters (2”-4" rather than 1" deep).
- With the pleats vertical, align the arrows on the filter with the direction of air flow through the fan. Air should flow through the filter first to capture particles and then into the fan. Next, secure the filter to the fan using duct tape, clamps, or bungee cords. Make sure there are no gaps so air flows through the filter, not around it.
- Cover the outside corners of the front of the box fan so that air flows only through the center part where the blades are visible. This is often called a shroud and pulls air through the fan more efficiently. See "Tips for Making a Shroud" in sidebar.
DIY Air Cleaner #2: Wedge Design
Supplies for DIY Air Cleaner #2
- Two 20" x 20" x 1" to 4" Furnace/HVAC Filters
Note: Suggested rating: MERV 13 - 20" x 20" Box Fan
Note: Only use certified fans with UL or ETL markings (2012 model or newer) - Duct Tape
- Cardboard Shroud
- 2 Triangle Cardboard Cutouts (for the base and top)
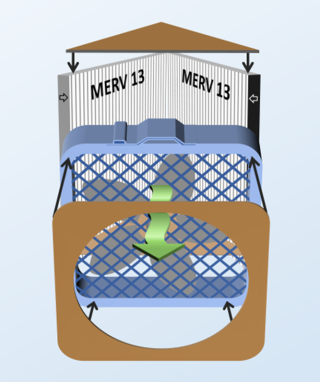
Another type of DIY air cleaner uses two filters to form a wedge. This design has more filter material and a higher CADR than the single-filter design, meaning it is more effective in catching particles.
- First, place the filters flat on a surface, side-by-side with the pleats parallel and the airflow arrows pointing up. Tape them together along the middle to create a hinge.
- Next, attach the filters to the fan, making sure the arrows align with the fan’s airflow. Seal any gaps with duct tape to maximize efficiency.
- Add triangular pieces of cardboard to the base and top to completely cover the space between the filters and fan. Seal them to the filters and fan with duct tape.
- Cover the outside corners of the front of the box fan so that air flows only through the center part where the blades are visible. This is often called a shroud and pulls air through the fan more efficiently. See "Tips for Making a Shroud" in sidebar.
DIY Air Cleaner #3: Cube/Box Design
Supplies for DIY Air Cleaner #3
- Four or five 20" x 20" x 1" to 4" Furnace/HVAC Filters
Note: Suggested rating: MERV 13 - 20" x 20" Box Fan
Note: Only use certified fans with UL or ETL markings (2012 model or newer) - Duct Tape
- Cardboard Shroud
- If using five filters, use leg supports (e.g., blocks) to allow airflow through the bottom.
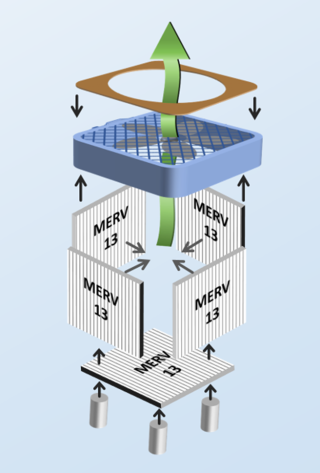
The third DIY air cleaner is a cube design. This design has the most filter material to catch particles. Of the three DIY air cleaner designs, this configuration has the highest CADR. Typically, these devices can perform longer before filters need to be replaced.
- Start by standing the filters upright with the pleats parallel and airflow arrows pointing inward. Tape the edges together to form a cube.
- Place the fan on top of the cube, front side up, and secure it with duct tape.
- Complete the cube using a piece of cardboard at the base (4 filter design) or add a fifth filter to the bottom for extra filtration (5 filter design).
- If you use a fifth filter, add leg supports to allow airflow through the bottom of the cube. Many kinds of items can be used as leg supports, such as wood blocks, bricks, or food cans. Select leg supports that are sturdy to prevent the air cleaner from tipping over.
- Cover the outside corners of the front of the box fan so that air flows only through the center part where the blades are visible. This is often called a shroud and pulls air through the fan more efficiently. See "Tips for Making a Shroud" in sidebar.
Choosing a Do-It-Yourself Air Cleaner Design
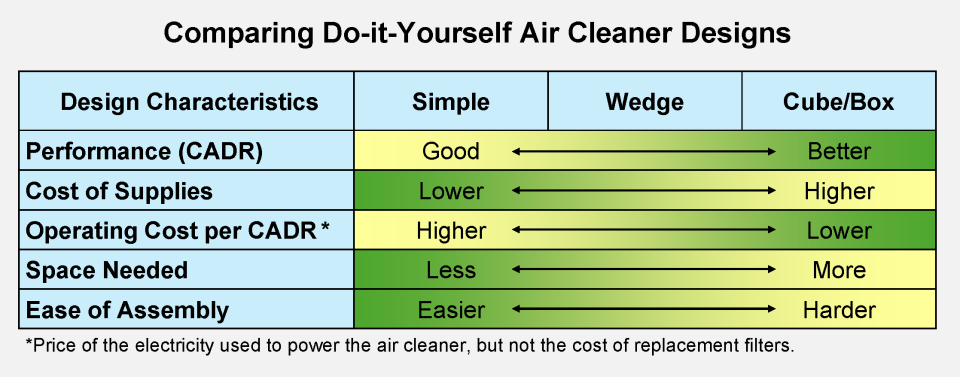
When choosing among DIY air cleaner designs, consider these design characteristics (as depicted in figure 1 below):
- Performance (CADR) - Multi-filter designs generally have superior performance over single-filter designs.
- Cost of Supplies - Single-filter designs can cost less to build than multi-filter designs.
- Operating Cost per CADR (price of the electricity used to power the air cleaner but not the cost of replacement filters) - Multi-filter designs can be more cost-effective to operate than single-filter designs.
- Space Needed - Multi-filter designs are bulkier in use and storage, and more difficult to move around than single-filter designs.
- Ease of Assembly - Multi-filter designs can be harder to put together, and more difficult to replace their filters than single-filter designs.
Additionally, using multiple single-filter units in the same room is also worth considering when balancing performance, cost, space, and ease of assembly for your specific needs.
Operating Considerations and Safety Tips
Follow these tips to improve the effectiveness of your DIY Air Cleaner:
- Use more and thicker filters: DIY air cleaner designs that use more filters and thicker (2-4" rather than 1" deep) filters are generally much more effective (higher CADR).
- Make a shroud: Adding a shroud to the front of the box fan significantly improves filtration performance. You can use cardboard (such as from the box the fan came in), duct tape, or wood to create a shroud.
- To make a shroud, first tie a string to a pen or pencil. Use one hand to hold the tip of the pen or pencil over the edge of a fan blade and another to extend the string to the center of the fan to measure the distance from the center of the fan to the tip of the blade. Hold the string in the center of the shroud material and use the pen or pencil to draw a circle on the cardboard or wood. Then cut it out and attach it to the fan.
- The shroud should cover the front of the box fan and have a circular opening to allow air to flow only through the center part where the blades are visible.
- Improve the seal: Tightly seal edges where the filter(s) are attached to the fan, other filters, and any cardboard pieces (for DIY Air Cleaners #2 and 3) to improve airflow through the filter.
In addition, these tips can help you get the most out of your DIY air cleaner:
- Run the DIY air cleaner as often as possible on the highest fan speed whenever the room is occupied. Air cleaning performance improves at higher fan speeds, although noise and air movement in the room also increase.
- Make sure air can flow freely through the device by keeping the air cleaner away from objects and walls.
- Have extra filters on hand and change the filter when it appears dirty or starts to smell. When IAQ is severely degraded over an extended period, such as during a smoke event, filters may need to be changed every few weeks or days.
- When changing the filters, remove them gently and avoid shaking or banging them to minimize the release of accumulated dust. Wash your hands after you have disposed of the filters in a garbage bag.
Finally, if you use a DIY air cleaner, follow these safety tips:
- Use a newer model box fan (built in 2012 or more recently) and look for one with a UL (Underwriters Laboratory) or ETL (Intertek) safety marking. These newer models have added safety features. Fans built before 2012 may pose fire risks. If you must use a fan built before 2012, do not leave it unattended and do not use it while sleeping.
- Follow the box fan manufacturer’s instructions, such as:
- Do not leave children unattended when the fan is in use.
- Do not use an extension cord.
- Do not use a damaged or malfunctioning fan.
- Ensure that there are working smoke detectors throughout the home.
Additional Resources
Do-it-Yourself Air Cleaners:
- DIY Air Cleaner to Reduce Wildfire Smoke Indoors Infographics
- EPA Research on DIY Air Cleaners to Reduce Wildfire Smoke Indoors
Portable Air Cleaners and HVAC Filters: